I had started planning a beach themed party for my daughter's birthday party but all of a sudden she started loving Monsters Inc. I knew I had to do that theme. So, I scrapped my beach idea and dived head first into planning a Inc party.
Can I just start off by saying there are NO Monsters Inc decorations?? Sometimes, you can get lucky and find Monsters University items but Vivienne is not into that movie as much. So, I had to make most of the decorations myself.
I started off by making a few stand up props out of cardboard. Boo's door was super easy to paint.
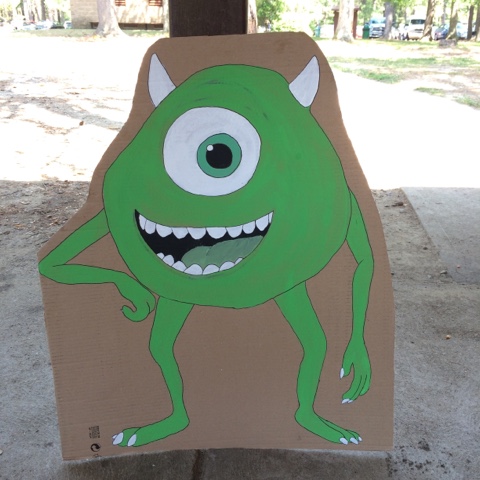
Mike was a little harder but I really wanted to make him because he is Vivie's favorite.
I had lots of fun making these scream canisters from Pringles containers. I used yellow card stock for the outside. All the details were added on using colored electrical tape and they were very easy to make. I made 4 in about 15 minutes. So easy and super cute!
I made so many Mike eyes, I swear I dreamt about them. I attached them to lime green buckets to put snacks in on the tables.
They were fun to make crazy faces with too! Haha
For Sulley's tables, I found teal bowls and taped purple dots on them. A circle punch was a huge time saver!
Next, I made some banners. Pretty easy just blue and green cardstock with the eyes and purple dots glued on.
The cake was fun but time consuming! I used a Wilton #233 tip to pipe blue "fur" all around the outside of the cake. Start at the bottom and work your way up.
To save time, I just used premade frosting. I spotted this awesome blue frosting at Target.
Then, I had to go back around and add in some purple spots and using a Wilton #12 tip, piped dots around the outside.
I had the Mike figure already and found the perfect candle for $1 at a local store. I found the doors on a shop on Etsy and printed them out on cardstock. I used yarn attached to two skewers and taped them on.
Vivienne loved it!
The cupcakes came out cute too!
The purple frosting came with the perfect colored sprinkles. We just picked the black ones out because they didn't match.
I finished up the cutest little dress for her the night before.
I love these little buckets. I buy them from Target for every party to put the forks, knives and spoons in. I found these buckets a few weeks back. As soon as I saw the teal and green stripes, I knew they would be perfect. I printed out pics of the characters and taped them on.
I found these balloons at the local grocery store totally by chance!
Finally, it was party day! Wish I had gotten better pics of it all together but I always forget.
Vivienne loved it all. She hoarded all the Mike items. Haha
It was such a fun day and one of my favorites to put together!


.jpg)


